Christmas Activities for Kids | Babysits
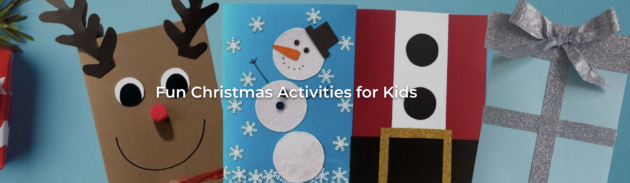
Fun Christmas Activities for Kids
Christmas is just around the corner, so it’s time to whip out the tinsel and get in the festive spirit! But with all the cooking, shopping, organising and wrapping that comes with Christmas, we know it isn’t always easy to keep the kids entertained at the same time. So to keep the kids out of your hair this holiday season, we’ve teamed up with our friends over at Babysits to bring you a list of fantastic Christmas crafts, simple recipes (that the kids can do on their own), colouring pages, and more.
You can watch these videos for instructions on how to create the Christmas crafts and recipes below.
Christmas Crafts: https://youtu.be/XsfnBDa5Y8Q
Christmas Recipes: https://youtu.be/J-p9O8NYRic
Christmas is a special time for bringing families and friends together. So, why not spoil your loved ones with a handmade card this Christmas? Gather the kids and have a go at recreating our Reindeer card, snowman card, sparkly present card, or our Santa card!
Reindeer Christmas card
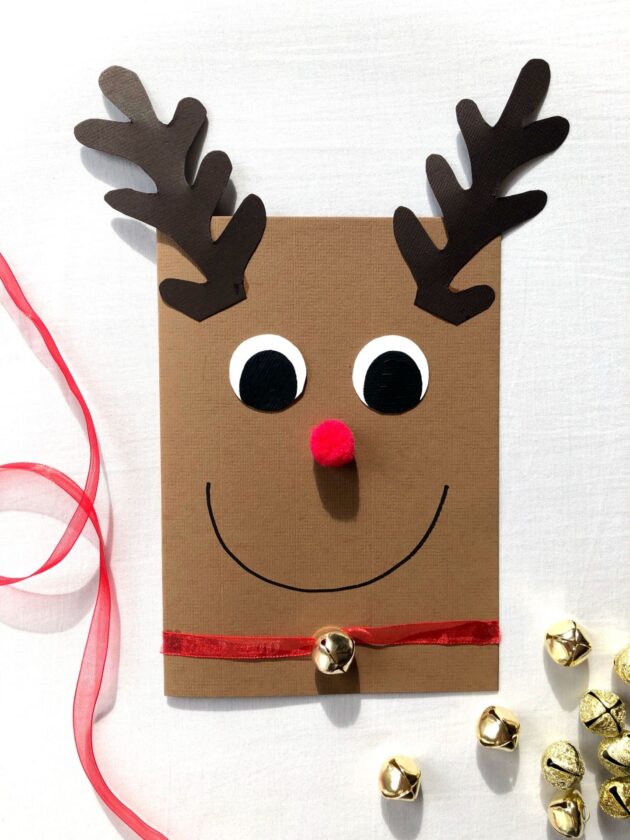
Materials:
- Light & dark brown card (A4)
- White card
- Craft glue
- Compass
- Black paint or a black texta
- 1 Red pompom
- Red ribbon
- 1 Bell
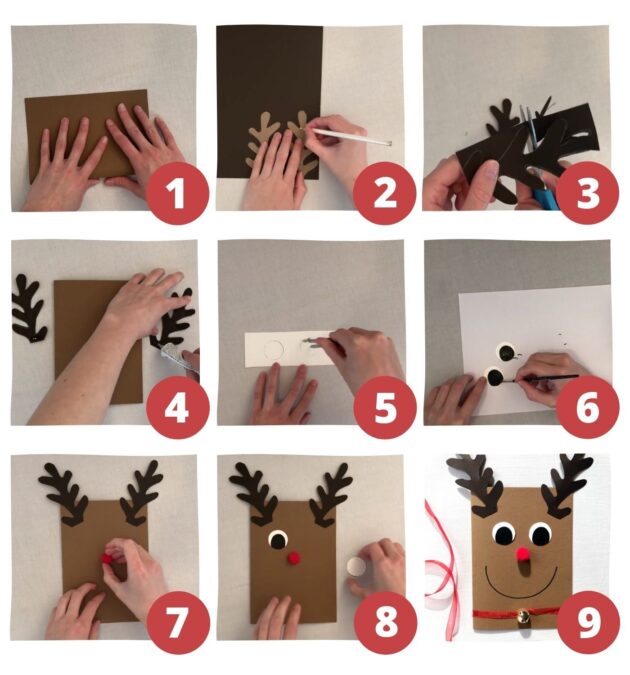
Step-by-step instructions:
- Fold the light brown card in half (this will form the base of your card).
- Using the dark brown card, draw the outline of antlers onto the card.
- Cut the antlers out (young children will need supervision).
- Using craft glue, glue the antlers at the top of the card.
- Using a compass, draw two circles on white card and carefully cut them out.
- Using black paint or a marker, paint a smaller circle in each white cut-out circle to create Rudolph’s eye (see the photo above for a better idea).
- Glue the red pompom nose in place with craft glue.
- Use the craft glue again to glue the eyes in place.
- Cut a length of red ribbon (about 15cm) and pull a bell through. Glue in place to create Rudolph’s collar.
Snowman Christmas card
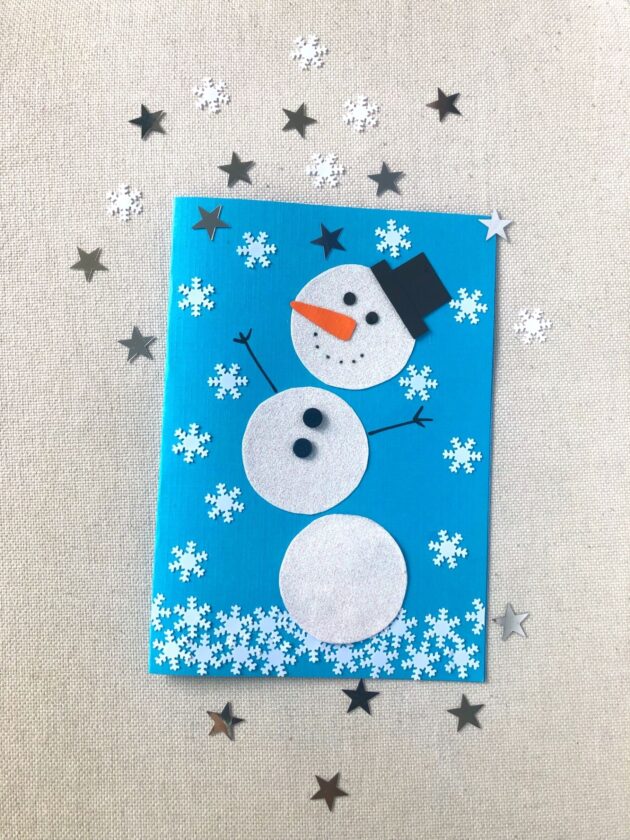
Materials:
- Blue card (A4)
- Sparkly white paper
- Compass
- Craft glue
- Snowflake confetti
- Small buttons
- Orange and black textas
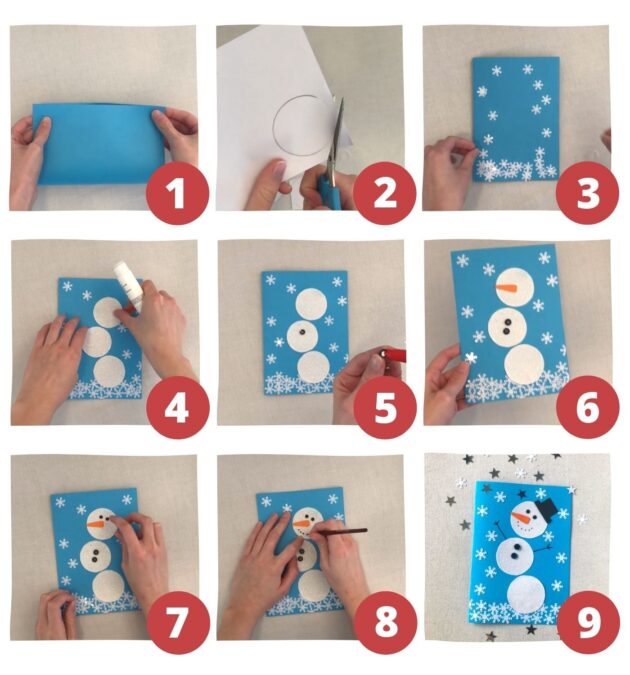
Step-by-step instructions:
- Fold the blue paper in half to create your card.
- Using a compass, trace 3 circles onto white sparkly paper and cut them out.
- Glue the confetti snowflakes onto the card.
- Glue the 3 circles onto the card.
- Glue two buttons on the middle circle.
- Colour an orange triangle of paper and cut-out to create the snowman’s carrot nose. Glue carrot nose in place.
- Cut out two small black circles and glue in place (to create the snowman’s eyes).
- Using a black texta, draw the snowman’s arms and smile.
- Use black paper or colour a piece of paper black to create the snowman’s hat, and you’re done!
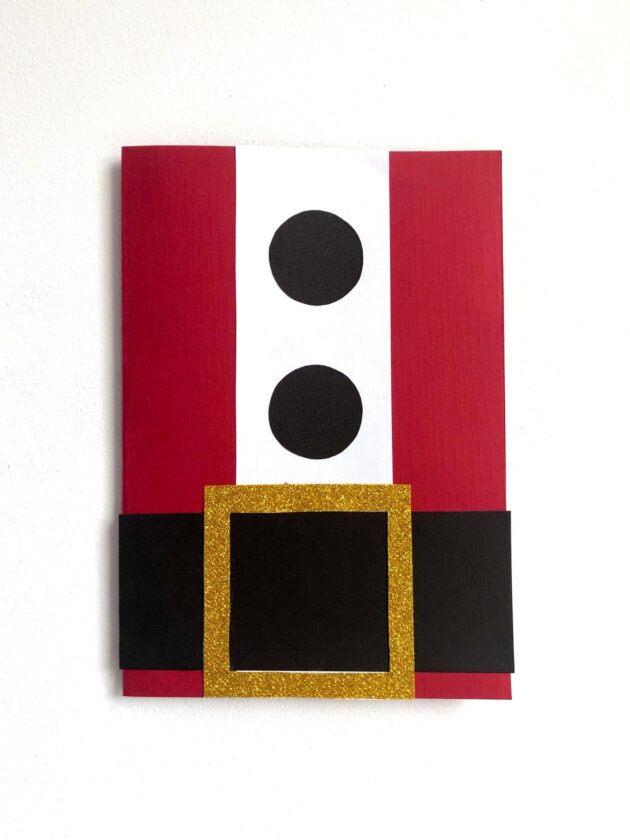
Santa Christmas card
Materials:
- Black, white and red paper
- Glue
- Compass
- Sparkly gold paper
- Stencil knife
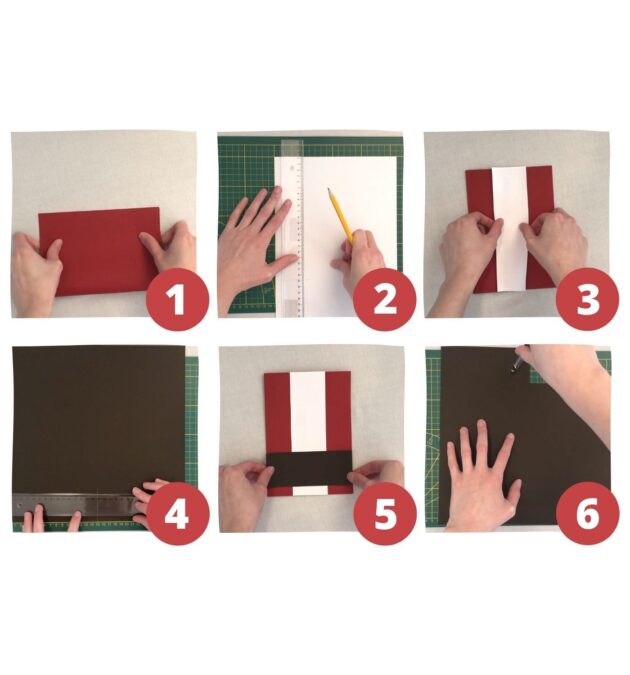
Step-by-step instructions:
- Fold an A4 piece of red paper in half to create the base of your Santa card.
- Cut a length of white paper to make Santa’s shirt.
- Glue the length of white paper vertically in the centre of the red card.
- Trace and cut a length of black paper to form Santa’s belt.
- Glue the black paper belt in place.
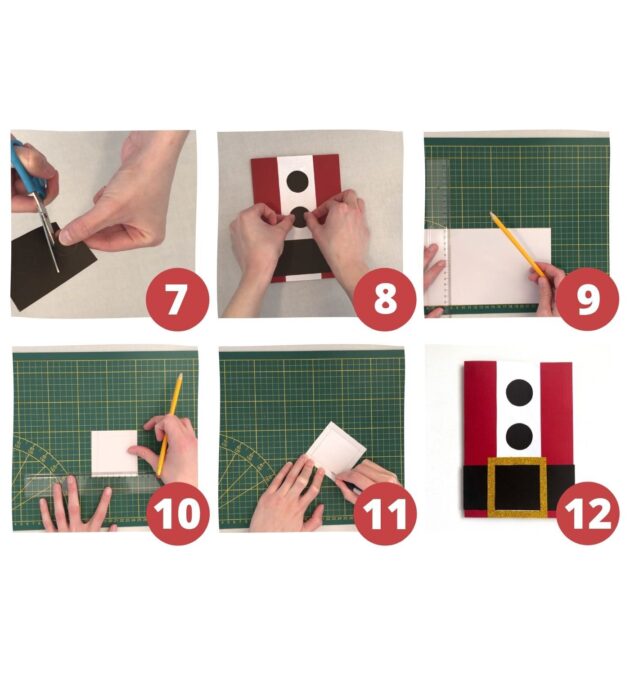
- Using your compass, trace two circles onto black paper.
- Using a pair of scissors, carefully cut out the black circles.
- Glue the black circles into the centre of the white strip.
- Cut out a square from gold sparkly paper (ours was 8cm by 8cm).
- Trace a slightly smaller square (1cm less on all sides) from inside the original square (ours was 6cm by 6cm).
- Use a stencil knife to carefully cut the smaller square from the larger square (this step is unsuitable for children to do alone and will require the help from a parent or guardian).
- Glue the gold sparkly square in the centre of the black paper to create the belt buckle!
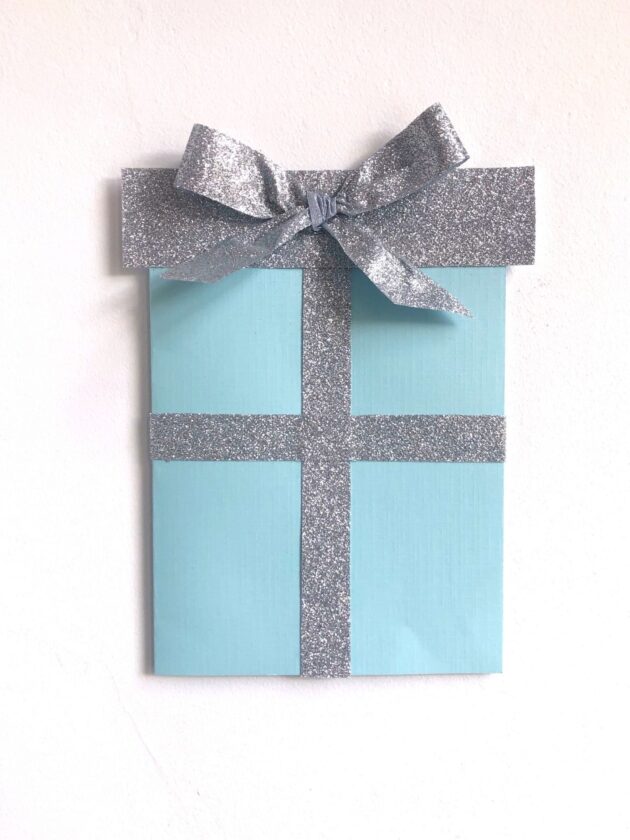
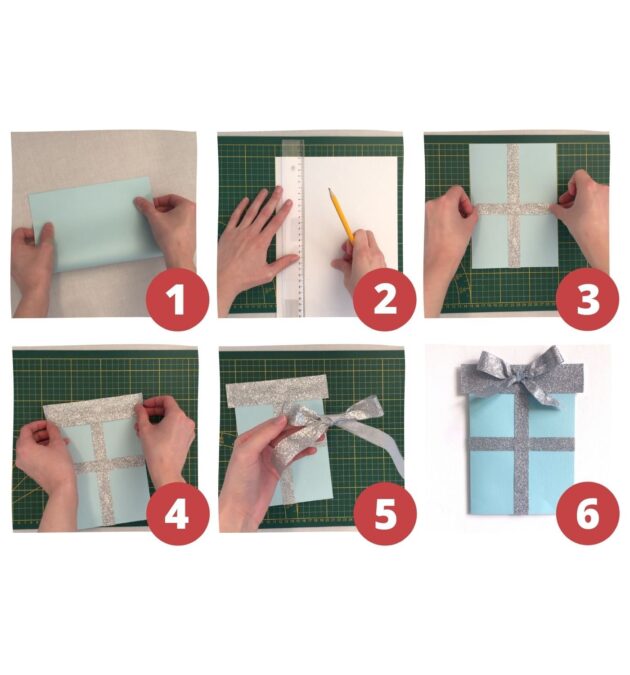
Present Christmas Card
Materials:
- A4 blue card
- Silver sparkly paper
- Glue
- Silver ribbon
Step-by-step instructions:
- Fold the blue card in half.
- Trace and cut two long rectangular shapes from the silver sparkly paper (vertical strip is 21x2cm and the horizontal strip is 15x2cm).
- Using craft glue, glue both pieces of sparkly silver paper in place.
- Cut another piece of sparkly paper (17x4cm) and glue it at the top of the card.
- Tie a bow from a length of sparkly ribbon.
- Glue the bow in place at the top of the card and cut the ends shorter (if necessary).
Christmas Ornaments
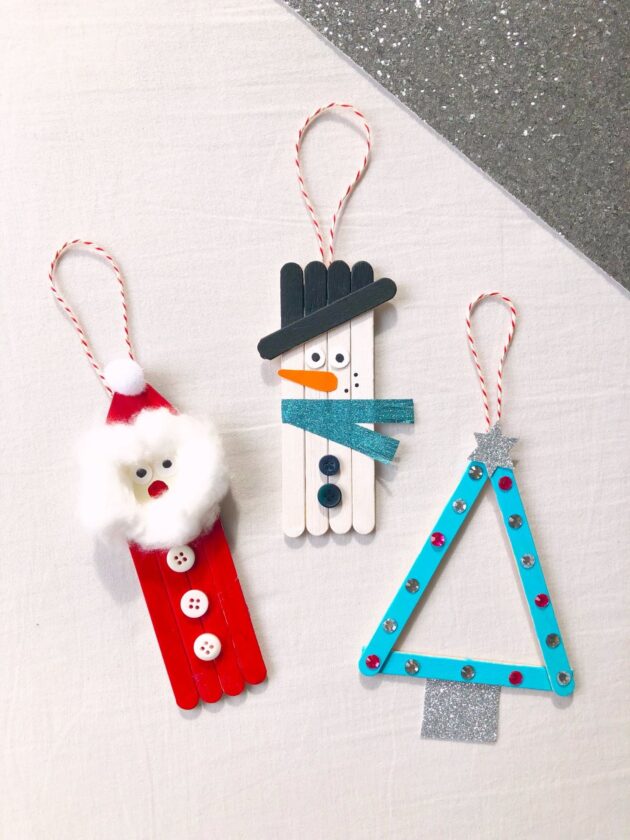
There’s nothing that spells the beginning of the festive season quite like decorating the Christmas tree! Why not let the kids add a personal touch to the tree this year with these cute and cozy Christmas tree decorations? They’re simple, easy, and fun to do together!
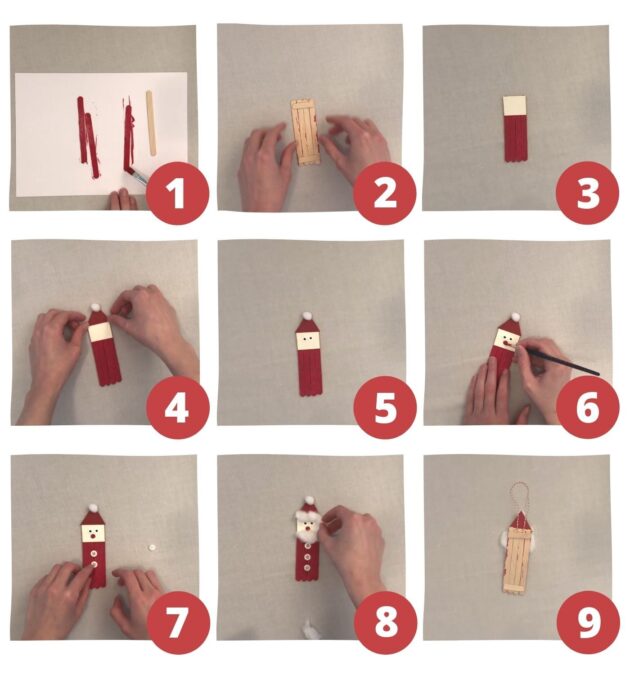
Santa Christmas ornament
Materials:
- Popsicle sticks
- Red and black textas or paint
- Glue
- White and red paper (or you can colour white paper)
- 1 small white pom pom
- 3 small buttons
- Cotton wool
- Ribbon or string
Step-by-step instructions:
- Paint or colour 4 popsicle sticks red.
- After the popsicle sticks have dried, cut a popsicle stick in half and glue it to the back of the 4 popsicle sticks (to hold them together and form the base of your xmas tree ornament).
- Cut out a small square piece of paper and glue it to the top of your popsicle sticks.
- Cut out a triangle shape from red paper and glue a small white pom pom at its top to form Santa’s hat.
- Create eyes for Santa by colouring two black dots on some paper and cutting a circle carefully around each black dot.
- Paint or colour a red spot in the centre of Santa’s face for his cold nose.
- Glue 3 buttons on the front of the ornament for Santa’s shirt.
- Use your fingers to break up a cotton ball and glue carefully around Santa’s face.
- Glue a length of string to the back of the ornament and wait for it to dry before hanging on the Christmas tree!
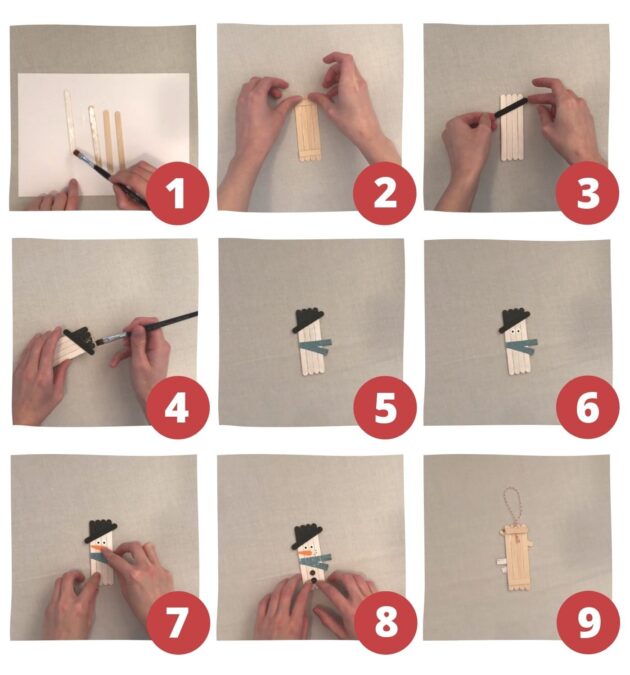
Snowman Christmas ornament
Materials:
- Popsicle sticks
- Black, white and orange textas or paint
- White paper
- Ribbon or string
- Sparkly blue paper
- Glue
- Small buttons
Step-by-step instructions:
- Paint or colour 4 popsicle sticks white.
- Cut a popsicle stick in thirds and glue two of the thirds to the back of the 4 popsicle sticks to hold them together.
- Paint or colour the remaining third of a popsicle stick black and glue it at an angle to create the snowman’s tilted tophat.
- Paint (or colour) the rest of the tophat black.
- Using sparkly paper, cut out two thin strips and glue in place as a scarf. Tip: cut the edge of the scarf to make tassels.
- Create eyes for your snowman by colouring two black dots on some paper and cutting a circle carefully around each black dot.
- Use paint or a texta to create an orange triangle and glue it in place for the snowman’s carrot-nose.
- Using a black texta, draw the snowman’s spotted smile and glue 2 buttons on his chest.
- Glue a length of string or ribbon in place, wait for it to dry and hang your new snowman ornament on the tree!
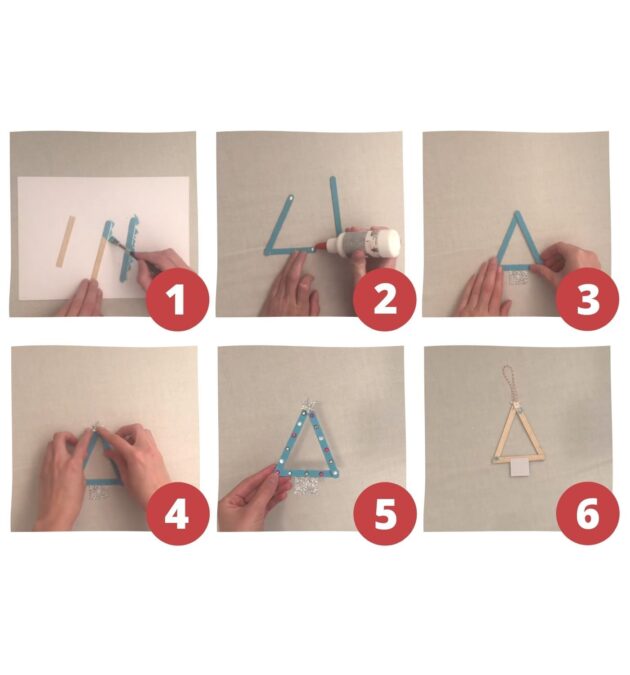
Christmas tree ornament
Materials:
- Popsicle sticks
- Glue
- Blue texta or paint
- Sparkly paper
- Gems
- Ribbon or string
Step-by-step instructions:
- Paint or colour 3 popsicle sticks blue or any other colour you fancy (one of the popsicle sticks should be shorter than the other two).
- Once the popsicle sticks are dry, glue them together to form a triangle.
- Cut a square from sparkly paper and glue to form the base of the tree
- Cut a star from the same sparkly paper and glue it to the top of the triangle.
- Glue colourful gems along the tree for some extra glam.
- Glue a short length of ribbon or string to the back of your Christmas tree ornament, wait for it to dry and hang it on your tree!
Christmas Toilet Paper Roll Crafts
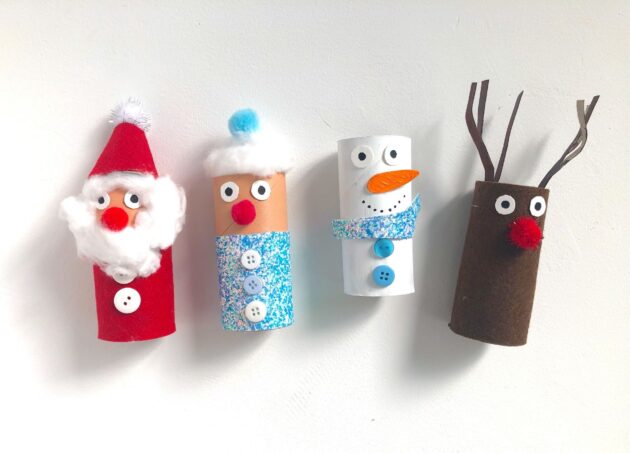
Get into the festive spirit (if you weren’t already!) with these super cute toilet paper crafts the kids are sure to love. Try your hand at making a Rudolph, snowman, Santa, Mrs Claus… Or why not create all three?
Toilet Paper Roll Snowman
Materials:
- 1 empty toilet paper roll
- White and orange paint or textas
- White paper
- Black texta
- Sparkly paper
- Small buttons
- Glue
Step-by-step instructions:
- Paint the empty toilet paper roll white and leave to dry.
- Create eyes for your snowman by colouring two black dots on some paper and cutting a circle carefully around each black dot.
- Glue the eyes in place.
- Cut a long, thin piece of sparkly paper and wrap it around your toilet paper roll to form a snowman’s scarf.
- Glue two small buttons to the snowman’s chest.
- Cut a triangular shape from paper and paint or colour it orange for snowman’s carrot nose. Glue it in place and use a black texta to draw his mouth.

Toilet Paper Roll Reindeer
Materials:
- 1 empty toilet paper roll
- Brown felt paper
- 1 small red pom pom
- White paper
- Black texta
- Glue
- Brown texta or paint
- Stapler
Step-by-step instructions:
- Measure the length and width of your toilet paper roll and then cut out the same size from brown felt paper. Wrap the brown felt paper around your toilet paper roll and glue firmly in position.
- Glue a small red pom pom in place for his nose.
- Create eyes for your reindeer by colouring two black dots on some paper and cutting a circle carefully around each black dot.
- Create antlers by cutting thin strips of brown paper.
- Use a stapler to position the antlers at the reindeer’s head.
- Bend the antlers and voila – you’re done!

Toilet Paper Roll Mrs Claus
Materials:
- 1 empty toilet paper roll
- “Skin colour” paint of your choice
- Sparkly paper
- Blue and red pom poms
- Black texta
- White paper
- Glue
- 3 small buttons
- Cotton wool
Step-by-step instructions:
- Paint ⅓ of the toilet paper roll.
- Cut out a length of sparkly paper and wrap it around the toilet paper roll.
- Glue a red pom pom nose in place and glue eyes in place (create eyes using the same method as above).
- Glue 3 buttons in place.
- Glue cotton wool in position for Mrs Claus’ hair.
- Glue a small pom pom on top of Mrs Claus’ hair and you’re done!

Toilet Paper Roll Santa

Materials:
- 2 empty toilet paper rolls
- “Skin colour” paint of your choice
- Small pom poms (red and white)
- White paper
- Cotton wool
- 2 small buttons
- Black texta
- Red felt paper
- Glue
Step-by-step instructions:
- Paint the toilet paper roll.
- Measure the toilet paper roll and cut an equal-sized piece from red felt paper. Glue the felt paper around the toilet paper roll.
- Glue a red pom pom onto the toilet paper roll for Santa’s nose.
- Create eyes for Santa by colouring two black dots on some paper and cutting a circle carefully around each black dot.
- Glue the two small buttons in place.
- Pull cotton wool apart and glue it carefully to make Santa’s beard.
- Cut a rectangular shape from another toilet paper roll and glue an equal-sized piece of felt paper to it.
- Bend the rectangular piece to form a cone-shaped hat. Glue a white pom pom to the top of Santa’s hat.
- Tuck Santa’s hat into position at the top of the toilet paper roll, and you’re done!
Christmas Recipes
Hot Chocolate Marshmallow Snowman

If it’s too hot to make a hot chocolate, why not recreate this recipe as a cold chocolate? Simply use cold water or milk to create a cozy cold chocolate this Christmas season!
You’ll need:
- Chocolate drinking powder
- Milk of your choice
- Marshmallows
- Pretzel sticks
- Decorative icing
- Smarties or mini M&M’s
- Whipped cream
- Skewer stick/kebab stick
Method:
Marshmallow Snowman
- Grab a skewer stick and slide 4 marshmallows onto it.
- Using a decorative icing squeezy tube, draw the snowman’s face and buttons.
- Place a smartie or mini M&M for his nose.
- Break a pretzel stick and push the sticks in place to make his arms.
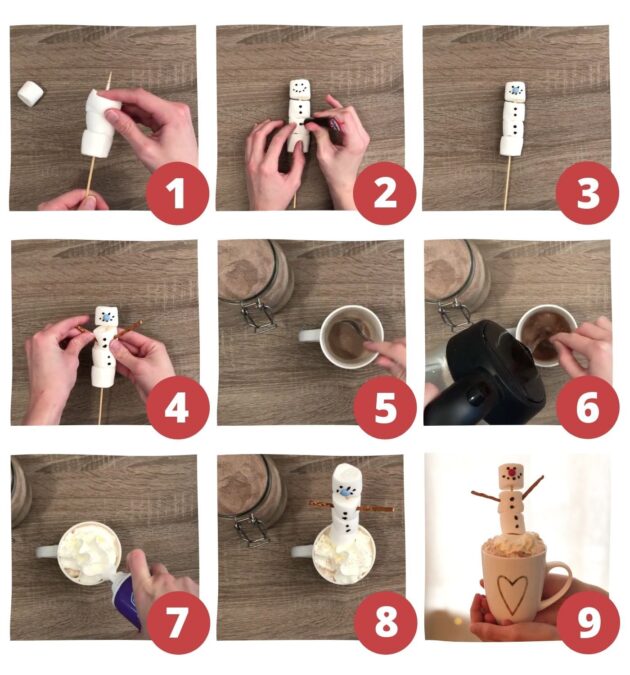
Hot Chocolate
- Spoon 3 heaped teaspoons of chocolate powder in a mug or glass.
- Mix with boiling water and add a bit of cold milk, or mix with cold milk on hot days.
- Add whipped cream on top (yum!).
- Sprinkle with a little bit of chocolate powder for an extra touch.
- Add your marshmallow snowman and voila – you’ve got yourself a sweet Christmas treat!
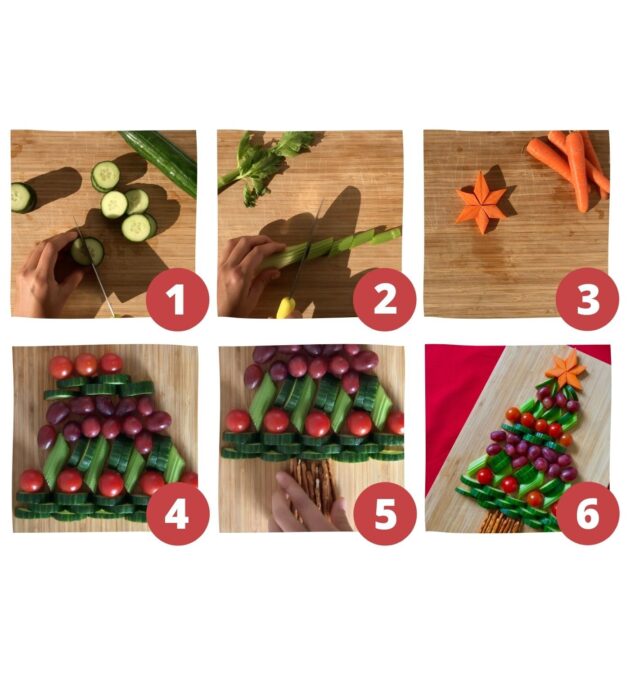
Healthy Christmas Tree Snack
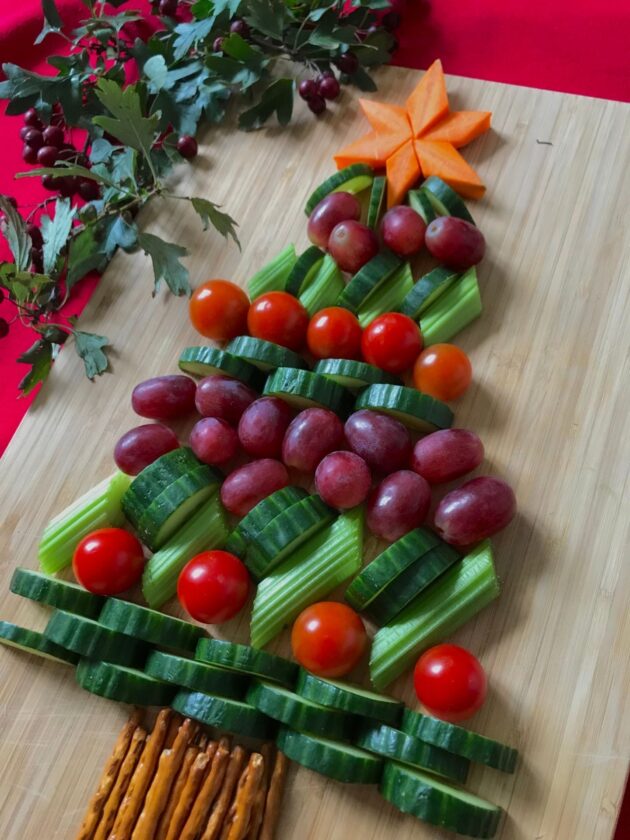
Christmas treats don’t always have to be loaded with sugar! This healthy Christmas tree platter is a great option to place in front of your family while they wait for Christmas dinner or lunch to be served (and it’s super fun to make!). Serve it with a dip for extra flavour.
You’ll need:
- Cherry tomatoes
- Cucumber
- Grapes
- Celery
- Carrot
- Pretzel sticks
- Your favourite dip
Method:
- Cut the cucumber into 1cm thick slices and then halve the cucumber slices.
- Cut the celery at diagonals.
- Carefully cut 6 diamond shapes from the carrot to form the star.
- Lay out all the fruits and veggies on a tray in a Christmas tree shape.
- Add a handful of pretzel sticks to create the base of your tree.
- Serve with your favourite dip and enjoy!
Colouring Pages
Colouring pages are a great way to keep the kids entertained in the lead up to Christmas. Simply print out our colouring pages, hand the kids some coloured pencils and let them go to town!
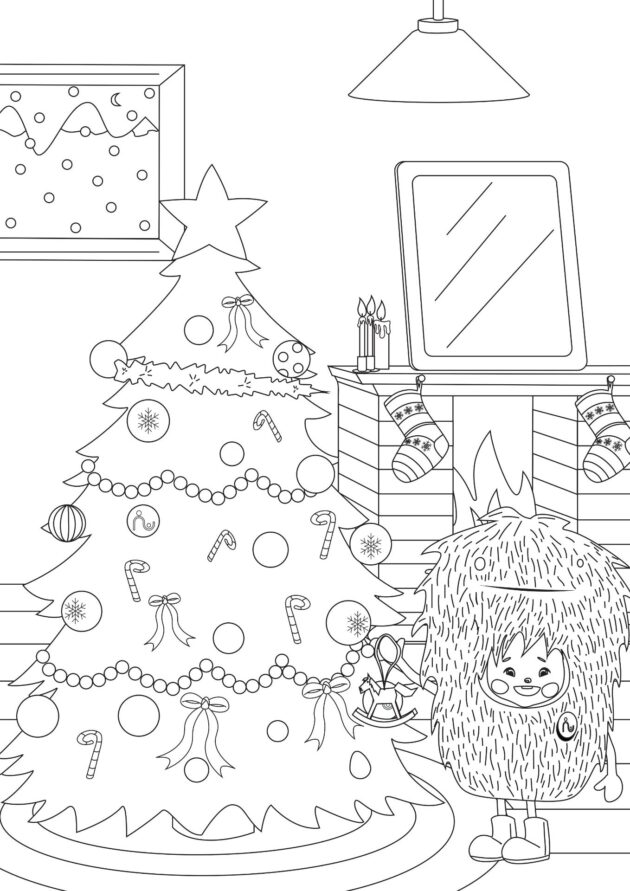
Christmas Tree Colouring Sheet
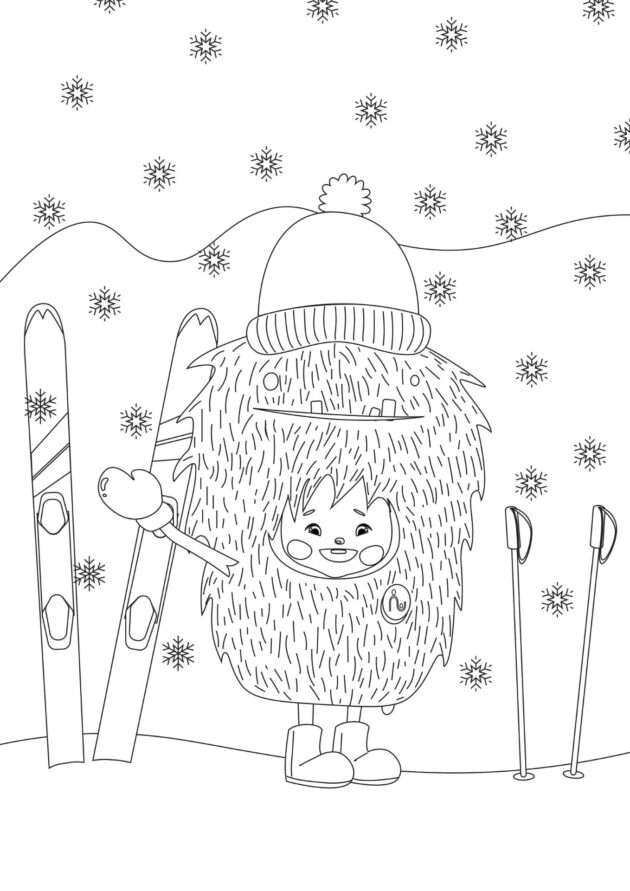
Christmas Skiing Colouring Page
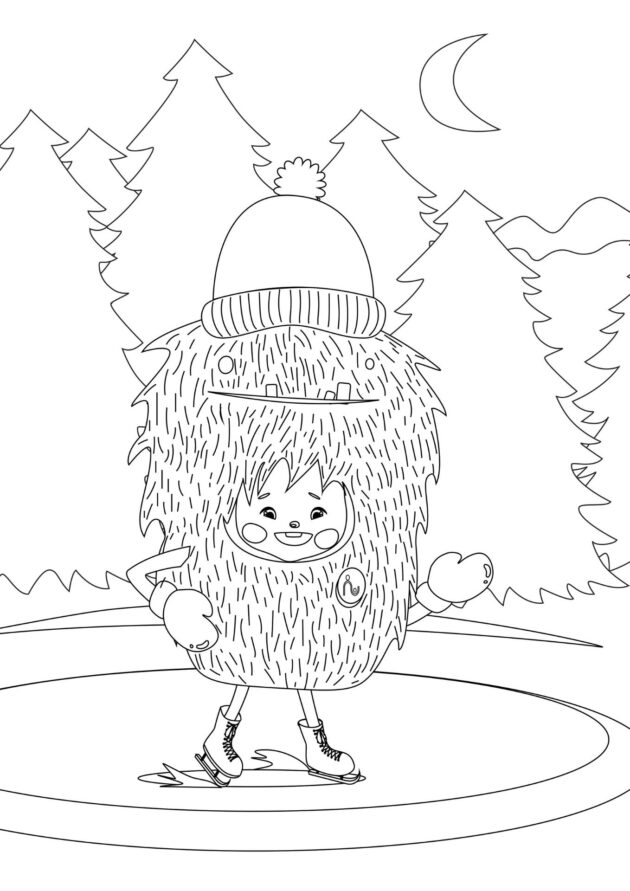
Ice Skating Colouring Sheet
Happy holidays from the Babysits and the Play and Go team! We wish you a safe and happy festive season.
Are you looking for a fantastic babysitter near you? Use Babysits to find a sitter today!


For more information and all enquiries please visit the Babysits website
At Play & Go Adelaide we make every effort to provide accurate information to the best of our knowledge at the time of publication. We recommend confirming times, dates and details directly before making any plans as details may be subject to change.
Image Source: supplied
SUBSCRIBE
Want to get all the latest events and activities straight to your inbox?
Subscribe to our weekly email newsletter below to keep up to date with our latest posts and find out all the best events & activities for Adelaide families. Newsletters are only sent once a week, and you may sometimes get a special offer exclusively for our subscribers only!