Phases of the Moon Astronomy Craft
Phases of the Moon Astronomy Craft
Kids are often fascinated by all things related to outer space and astronomy. Help teach your kids about the Moon with this cool Moon phase activity, complete with a Moon phase worksheet!
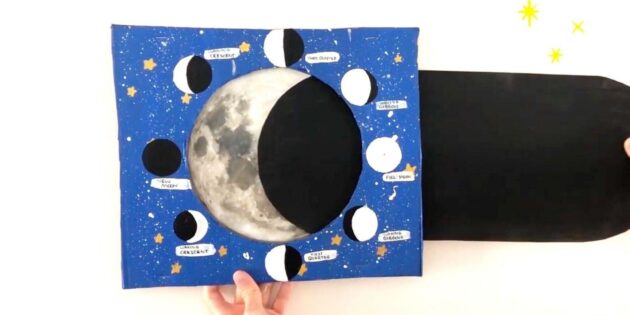
This activity involves creating a ‘moon phase slider’. You’ll be able to move the slider to expose different phases of the moon! You can read more about each phase of the moon below.
This article is written in collaboration with Babysits – Australia’s babysitting community. If you’re looking for babysitters in Adelaide, they are a great resource with thousands of quality childcare providers near you.
Materials needed:
- Paint (or if you want to avoid the mess, textas, crayons or coloured pencils will also do the trick!)
- Scissors
- Glue
- 2 × pieces of cardboard (equal in size)
- Large piece of thick paper (preferably black)
- Stapler
- Picture of the Moon (print one out or have a go at drawing it yourself!)
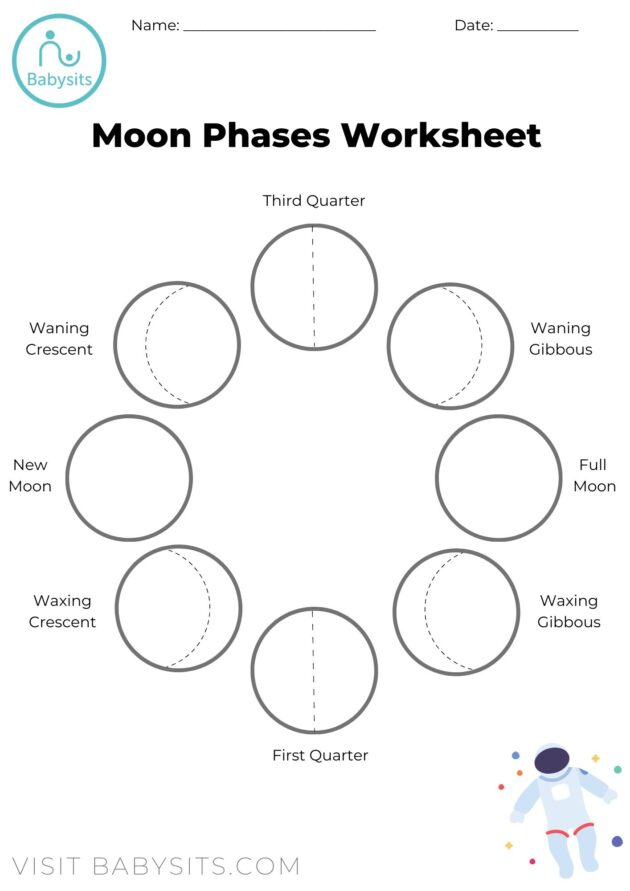
- Phases of the Moon worksheet (see below)
CLICK HERE TO DOWNLOAD THE MOON PHASES WORKSHEET BELOW
Steps:
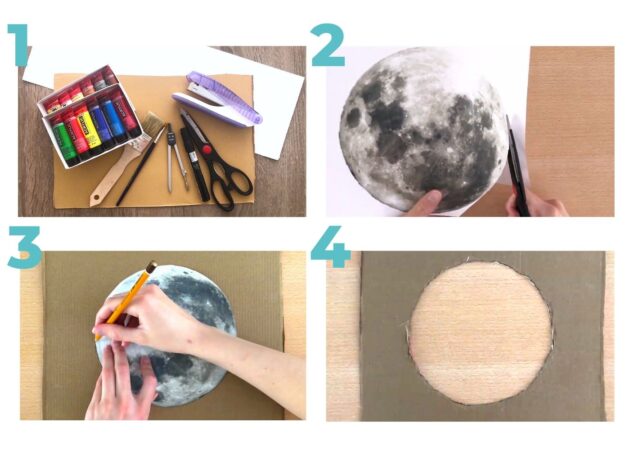
- First, prepare all the materials you’re going to use.
- Print out a large picture of the Moon and cut it out (or have a go at drawing one!).
- Using a pencil, trace the outline of your moon onto the centre of a piece of rectangular-shaped cardboard.
- Now that you have a circle drawn onto the cardboard, cut it out (cardboard is tricky to cut through, so this part will require the help of an adult).

- Glue your picture of the Moon in the centre of the second piece of cardboard.
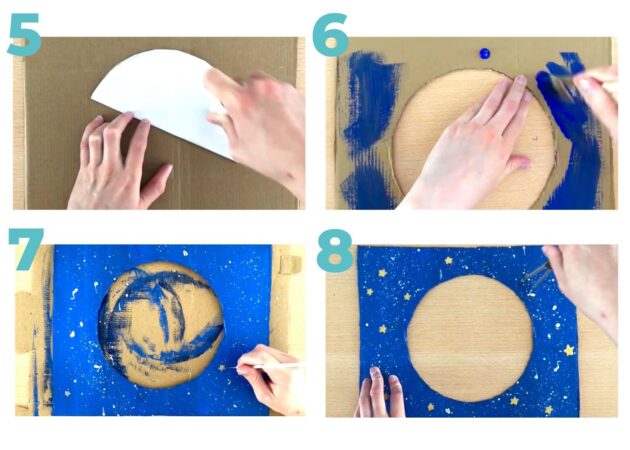
- Paint the first piece of cardboard (the piece with the circle cutout) in a colour of your choice (we chose dark blue!).
- Once the paint has dried, add some details like stars for a cool galaxy theme!
- Once the paint has dried for a second time, use a compass to draw 8 small circles (moons) around the circular cutout.
- Paint each small circle (moon) white.
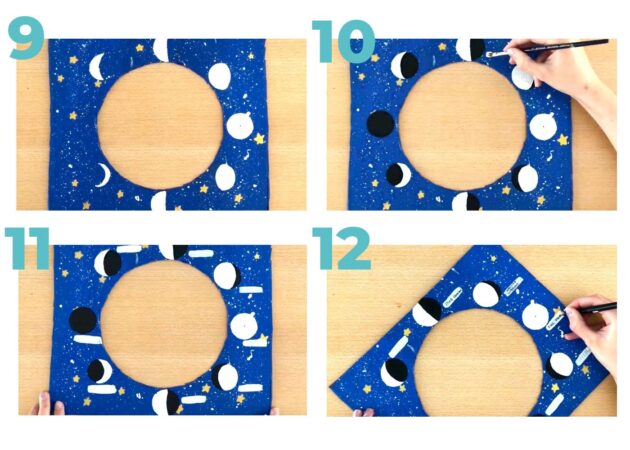
- Using the Moon phase worksheet for reference, paint the shadows of each small moon to show the different phases of the moon!
- Paint a white line next to each small moon.
- Label each of the 8 moons according to their phase of the lunar cycle. Refer to your worksheet if you need help.
- Once you’ve written each phase of the moon next to the correct picture, give yourself a pat on the back! Well done.
- Take a large piece of thick paper and cut it to the same width as your printed picture of the Moon. Trim the corners so that they are curved to form a half circle.This long piece of paper will act as the slider.
- Paint this long piece of paper black (unless you happen to have black paper, of course!). Leave to dry.
- Lastly, take both pieces of cardboard and staple them together at the bottom and top (making sure not to staple the sides; they should be left open). Pull your slider through, and voila! You’re done!
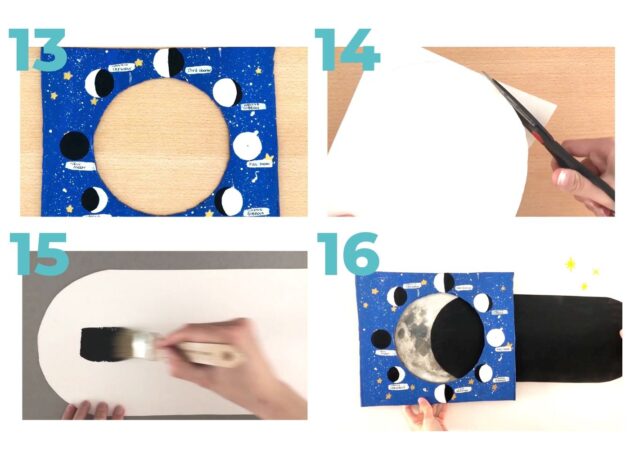
Move the slider back and forth to cast shadow over the Moon. See if you can create all 8 phases of the lunar cycle!
The different Moon phases are the ways the Moon can look from Earth (where we live!).
As the Moon circles around (orbits) the Earth, the sun reflects light off of the Moon’s surface. So, this means that the light we can see at night from the Moon is actually coming from the Sun! Wow, incredible!
As the Moon circles the Earth, the Moon looks as though it is changing shape. But it’s just an illusion! What’s really happening is that the sun is just lighting up different parts of the Moon, making it look different.
Why Does the Moon Change Shape?
It takes the Moon a full 29.5 days to complete its journey around the Earth! This journey around the Earth is known as a ‘lunar cycle’.
| Name | Moon Phase | Description |
| New Moon | ? | When the Moon is directly between the Earth and the Sun, we call this a New Moon. We cannot see the Moon because the unlit side of the Moon is facing Earth. Wow! |
| Waxing Crescent | ? | A waxing crescent Moon appears as a thin sliver. At this phase, the crescent shape grows in size so we say it is “waxing.” |
| First Quarter | ? | The Moon has now completed the first quarter of its orbit around planet Earth. We can see half of the Moon’s surface illuminated! |
| Waxing Gibbous | ? | The Moon is now almost entirely illuminated! The lit portion of the Moon’s surface will continue growing (“waxing”). |
| Full Moon | ? | Wow, a Full Moon! We can now see the entire Moon lit up. This occurs when the Earth is between the Sun and the Moon. |
| Waning Gibbous | ? | Now the Moon will appear to shrink in size. As the Moon gets smaller, we say it is “waning”. This phase of the lunar cycle is called Waning Gibbous. |
| Third Quarter | ? | We can see a half Moon again! This time we can see the other half of the Moon. This phase is known as the Third Quarter. |
| Waning Crescent | ? | We have another crescent Moon! This time the Moon is shrinking. We call this phase the Waning Crescent. |
Did you enjoy this astronomy activity? Check out Babysits for more fantastic crafts for kids!
CLICK HERE FOR MORE BABYSITS’ CRAFTS FOR KIDS

For more information and all enquiries please visit the Babysits website
At Play & Go Adelaide we make every effort to provide accurate information to the best of our knowledge at the time of publication. We recommend confirming times, dates and details directly before making any plans as details may be subject to change.
Image Source: supplied
SUBSCRIBE
Want to get all the latest events and activities straight to your inbox?
Subscribe to our weekly email newsletter below to keep up to date with our latest posts and find out all the best events & activities for Adelaide families. Newsletters are only sent once a week, and you may sometimes get a special offer exclusively for our subscribers only!